WordPress Website Design in Las Vegas
Is this article for you? If you are a Las Vegas business owner looking to build a new website and have been thinking about using WordPress, then yes this article is for you!
My team and I are expert WordPress designers, ready to help you build your new website. We can redesign existing sites, perform makeovers, and build brand new WordPress websites for your business.
I’m sure you have heard of how amazing WordPress is, in fact that’s probably why you are researching for a WordPress web developer in Las Vegas, NV. Our office is actually located in Henderson, NV, but we service all Southern Nevada business owners.
If you have never built a WordPress website, or any website for that matter, then I’m sure it sounds intimidating! Building a website sounds incredibly difficult. However it does NOT have to be.
You probably don’t think you have the skills or knowledge to do so…But don’t worry, I am here to prove you wrong. It can be done. And it can be done fast and painless!
We have worked with many small and medium sized business owners in Clark County helping them grow their business with a newly designed website. If you’d like to get insight into our streamlined process and professional designs, then contact us today.
If you are looking for a simple WordPress site that showcases your business, or hosts your blog, then this guide is for you! This guide is going to walk you through building a WordPress website.
If you’d rather just contact our team here in Las Vegas to build your website for you, then just reach out to me here instead. Our Las Vegas web design agency is ready to help you! We can discuss all the details of your project and I can determine if we’d be a good fit to work together or not.
There is so much to consider when creating your first website. It can be overwhelming. The basics for beginners will be discussed in this WordPress Setup Guide. Once you have finished with this resource, you will have a website that you can be proud of. You will also have enough knowledge to keep a basic WordPress website up and running.
WordPress Guide –
Table of Contents
Introduction
Chapter 1: Choosing a Host and Domain
Choosing a Web Hosting Company
Choosing a Domain Name
Chapter 2: Installing WordPress
Chapter 3: Picking & Installing a Theme
Choosing a Theme
Chapter 4: Adding Pages
Creating a Page
Adding Media to Your Page
Link a Website or Email Address to Your Page
Preview and Publish
Blog or Static Website
Chapter 5: Blogging on Your WordPress Site
Creating a Blogging Page
Comments on Your Blog
How to Add a Blog Post
Categories and Tags
Moderating Comments
Chapter 6: Customizing WordPress Settings
General Settings
Writing Settings for Blog Posts
Media Settings
Permalink Settings
Widgets
Chapter 7: Plugins
Conclusion
Introduction
When thinking about designing a website, you probably think that you have to be fluent in HTML, CSS, or some other coding language to build your website. You might think that it takes years of study and dedication to learn how to code a website and make it perfect.
However, technologies have evolved, and most people can create a website without knowing one bit of code. With a few simple steps, you can create a beautiful, professional website with little difficulty.
This was the purpose behind the design of the web platform WordPress. Originally created as a platform for bloggers, WordPress soon gained popularity due to its ease of use. Not to mention that it can also be used to build great looking websites!
You can make your website as simple or as complicated as you want with extra plugins and add-ons. WordPress gives everyone the ability to create a beautiful, professional website with minimal knowledge. Just follow a few simple steps, and your website will only limited by your imagination.
For our purposes here, I will give you an easy, step-by-step guide to creating a simple website with WordPress. This guide is for the beginner.
I will cover several steps necessary to start your own website, including choosing a host and a domain name, how to install WordPress through your host, picking a theme, adding basic content, creating pages, the difference between pages and posts, and starting to add plug-ins.
This all may sound like a foreign language right now, but by the time you finish this guide, you will have a basic understanding of each of these steps and how to implement them to create your own WordPress website.
In Chapter 1, the basics of choosing a host for your website and creating a domain name are discussed. Although there are many different options for having your site hosted, this step by step guide will focus on using Bluehost as your hosting service. Even if you have another host, you can still benefit from the steps in the rest of this book.
I often go with one of two hosting companies for WordPress websites.
Hostgator (here) or Bluehost (here). I chose to use Bluehost in this guide for two reasons:
1) I use it for many of my websites. It’s not the absolute best hosting company out there, however it will be able to handle just about anything that you want to do. And it’s cheap!
2) Also, Bluehost has one of the easiest set up processes out there. So if you are looking for ease of use, and want a good and inexpensive host, then you should go with Bluehost.
Once WordPress is installed, building a website is almost exactly the same as it is with other hosts. In Chapter 2, I’ll discuss how to install WordPress on your domain and hosting account. Chapters 4 and 5 will discuss how to get the look of your page by choosing a theme and adding pages. Chapter 5 will then discuss how to create a blog with your website. This includes writing and posting a blog, how to choose which page of your website your blog will appear on, and even how to moderate comments your readers may leave. Chapters 6 and 7 will dip into some more advanced techniques for WordPress. These two chapters are not in-depth, but will instead give you a taste of what WordPress can do if you take the time to learn the more advanced techniques. The advanced ideas are not necessary to create your site, but will be useful for you in the future.
I recommend bookmarking this resource. This information will give you the launching pad to create the website of your dreams!
So let’s get started. Take each chapter one at a time. This guide will go in sequential order, meaning you need to complete the work in the first chapter before you can do the work in the second, and so on. Nothing is too difficult if you take the time to understand it and go step-by-step.
Oh and if you have any questions, feel free to reach out to Website Tigers.
Good luck and happy designing!
Chapter 1: Choosing a Host and Domain
Before you can start a website, there are two things you will need to do. First, you need to pick a host server to hold your website. Once you have a host, you can choose the domain name for your website. Don’t worry if you don’t know what these are just yet, this chapter will describe both and how to set them up, in turn.
Choosing a Web Hosting Company
First, you need a place to host your website. A web hosting service is a company that will make your website available for others on the internet. They provide the server space and internet connectivity for others to access your site. You have probably heard of at least one of the ‘big players’. This is one hosting service that has created national ad campaigns so it has become the one most people are familiar with.
However, there are several services that provide better services for less money. I will not go into the differences in web hosting services here. In fact, I will describe how to set up a WordPress website using on of the top web hosting services: Bluehost.com.
I have chosen to use Bluehost for a few reasons- it’s very affordable, it’s easy to set up and use, it has great customer support, and one more important reason. Over the years as a website designer, I have come across many hosts. And don’t get me wrong there are better hosts out there. However I think the best option for someone in your position (just starting out with websites) is to go with Bluehost.
The one reason that I suggest them is actually pretty hidden to people buying hosting. Many other ‘cheap’ hosting companies don’t have a good up-time rating. Up-time is essentially the amount of time that your website is ‘up’ online. Most companies provide a 99% uptime guarantee. This means that 99% of the time your site will be available online. I’m guessing that you want your website to be online as much as possible, right? Then stick with Bluehost, I have had great experience with their uptime. AND if your site ever goes down, you can actually talk to someone with their support line.
For all of the reasons described above, Bluehost is a very popular service that has high ratings from its customers.
It has a great reputation and is one of the industry standards for hosting services. It is economical and comes with great customer support.
You can have all your questions answered almost immediately through their 24-hour chat support. They also have phone support available.
I have always found them to be reliable and helpful, and have used them for at least 5 years with no issues. Once you sign up with your domain, you will log in and be able to do the work necessary to get your website up and running.
NOTE: If you are looking for better or faster WordPress hosting (for example, if you will be getting more than 1,000 visitors to your website/month), then I suggest going with WP Engine. They are my go-to hosting company for more popular websites or websites that want a faster load time.
If you are just starting out, and not sure what to do, then I would simply recommend going with Bluehost. They are a great hosting company to start off with.
If you do want to explore other services, you need to compare their services and costs. Many web hosting companies will promise you great service, but with each additional service, the cost goes up.
Make sure you understand what is being offered when you sign up for services. If you are using WordPress to create your website, you don’t need many services. Hosting and domain services should be all that you need.
From here on out, the descriptions will be how to create a domain and install WordPress based on utilizing Bluehost as your host server. Other servers may appear slightly different in appearance, but the setup process is the same.
Once WordPress is installed, the directions should look the same for whatever web hosting service you choose to use. WordPress has its own set of controls separate from your server, so whatever server you choose, the directions for WordPress, once it is installed, will be the same.
Choosing a Domain Name
Once you have signed up for hosting services, you will need to create a domain. This is a two-phase process. First, you need to choose your domain name. After you choose a name and check to make sure it is available, then you need to register the domain with your hosting service. I will describe each step in turn.
Your domain name is incredibly important! It is what people remember and what they will go to when searching for you. It is what they type into Google when they are looking for you. It is important to pick the right domain name for what you are doing. It should be unique and let people know exactly what your site is all about.
If you have a business, it is best to keep your domain name your business name, but this is not always possible if that domain name is already taken. We will get to how to check your domain name in a minute.
If you are looking to create a site for yourself or your personal interests, you can always try to use your own name.
If your name is unique, this works great. However, if you have a common name such as Amy Jones, for example, you won’t have much luck.
If it is a personal site, you could also choose to create a domain name based on the hobby or interest you will devote the site to.
If you can’t find any domain names right away that are available, you can brainstorm for a domain name.
Think of five terms that relate to what your website will be about. Use these terms to come up with a combination that you like and that you can use.
Another thing to remember when you choose a domain name is to make it unique enough that people will not confuse it with other websites that exist out there. You don’t want people to look for you and find someone else. So it really is a balance between being unique enough to be a part of you and being easy enough for people to remember.
Here are some other things to keep in mind when picking a domain name:
- Use .com names. Although other extensions exist, such as .net and .co and even .vegas, .com is still the most well-known, and most people assume your site is a .com. You also have the option to register the same name with other extensions so people cannot use them. If you do this, you can direct all your different domains to point to one page.
- Make it easy to type and to spell. Typos will make it difficult for people to find you. Difficult words to spell make it hard for people to find you.
- Make it short and memorable. The longer it is, the harder it is to remember. You want it to come to people’s minds easily.
- Include keywords in your name. Using words pertaining to the subject of your site makes it easier for search engines to find you. For more on SEO click here.
- Don’t use hyphens. They just make the site name more difficult to remember. (Plus they don’t help with SEO anymore)
- Avoid using trademarked names. You don’t want your site to infringe on any copy rights. It can cause legal headaches that you don’t need.
Once you have a name you would like to use, you need to check it to make sure that it isn’t already taken by someone else.
If you already have your bluehost account follow these steps-
- In Bluehost, you can do this easily.
- Log onto your Bluehost account and go to your control panel.
- On the top menu panel, click on “Addons.”
- In the next screen, click “Domain Registration.” From there, type in the name you want in the box provided (Figure 1).
- Then hit the “Check” button and this will automatically search the web for the domain name you desire.
For example, I searched to see if the website amber.com was registered or not. Not only does it search .com names, it also searches other web extensions to tell me what is taken. Figure 2 shows the results of my search. Keep in mind that there are more than 150 million active domain names in the world, so you may not be able to get exactly what you want.
It may take some time and patience to come up with the right name.
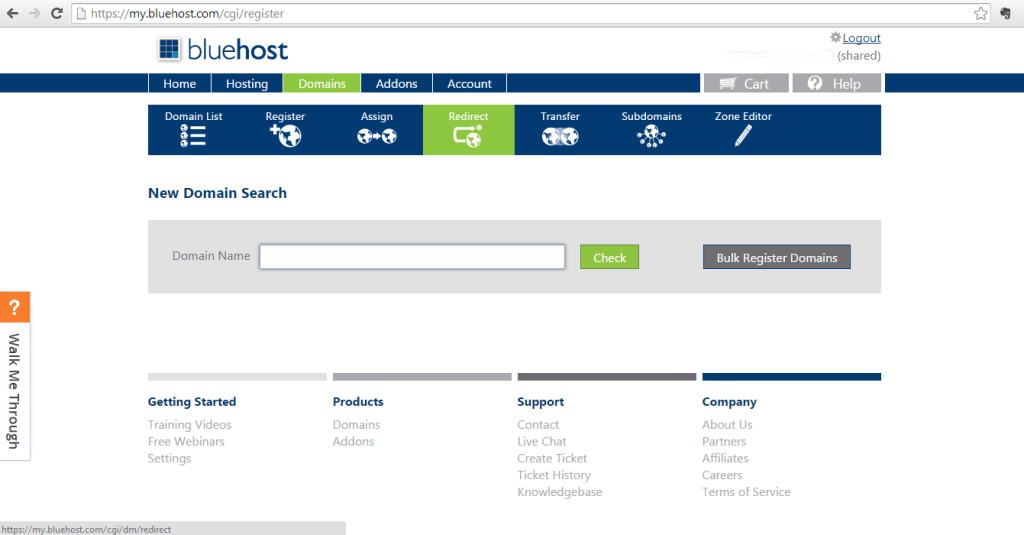 Figure 1
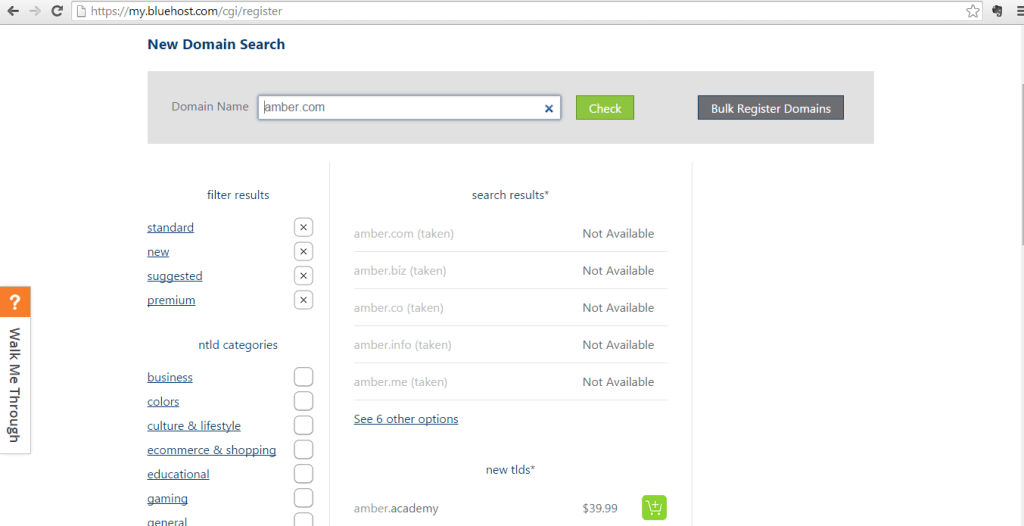
Figure 2
If the result says “Not Available,” as my example does, then you will have to come up with another name. It means that someone else has registered that name. Go back to the steps above and try other combinations to find a name that you like and is available.
If the name is available, it will give you the option to create that domain. It costs a little money to register your name and you will need to renew it yearly, but it will be your domain name for as long as you keep your registration current. If you allow it to lapse, others can claim it.
Once you register your domain name, the fun work of creating your vision can begin. The next chapter will describe how to install WordPress on your domain name through the Bluehost server.
Chapter 2: Installing WordPress
Bluehost gives you the option to install WordPress directly from its control panel, or cpanel. When you go to the WordPress site, log in with your account name and password. From the home screen, you can install WordPress directly. You will see the option to “Install WordPress” under the “Website” header, as in Figure 3.
Double click on “Install WordPress.” This will take you to a page with options. WordPress is a free system, and you can install it for free through Bluehost. This option is listed right at the top of the page. If you choose, however, you can pay for extra services, such as extra themes and more support. These options are listed lower on the page, under the free option installation. However, most people should choose the free option. You should have all the functionality you need using the free service.
 Figure 3
Once you hit the install button at the top, you will need to choose where to install WordPress. Click the arrow for the dropdown menu and choose your domain name. WordPress will then be installed on Bluehost’s server and you can access it from anywhere with an internet connection through the login, which I will describe in a minute.
Once it has been installed, you will get a screen that has four important pieces of information. The first is the web address. This should be your domain, such as www.ilikecupcakes.com. This is the name you registered with Bluehost. The second thing that it gives you is the web address to log into your WordPress access. Then it will give you a user name and a password. You need to take note of all these things- write them down. They will be very important for the steps to come.
One very important thing to note here, and one that confused me the first time I used WordPress (many years ago), is that your login for WordPress is NOT the same as your login for Bluehost. When you go to manipulate your WordPress account, you will use the website login info given when you installed WordPress. Conversely, you use your Bluehost account when you need to manipulate your Bluehost account. These are two separate entities.
To log in to your WordPress page, the address that they gave you should be this form: www.yourdomainname.com/wp-admin. So, if our site is “I love cupcakes”, then the login for WordPress will be www.ilovecupcakes.com/wp-admin. Then, you log in with the user name and password given when you installed WordPress.
The login page looks like this:
Once you log in, you will be taken to the WordPress dashboard, which looks like this:
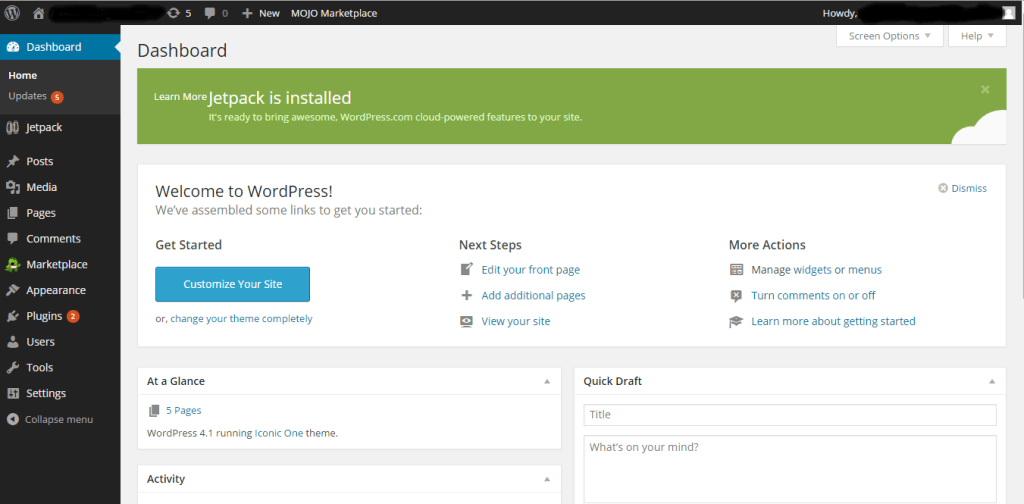 Figure 4
From here, you will be able to start building your website and manipulating its look. The next chapter will discuss how to pick the look of your WordPress website. You will pick a ‘theme’ for your site, which will define how it looks.
Chapter 3: Picking & Installing a Theme
Once you are logged onto your WordPress account and are at the dashboard, you can start the fun work of creating your website. The first step is to pick your theme.
Choosing a Theme
In WordPress, a Theme will define what your website will look like. It will change the colors and the placement of items on your site without you having to manipulate any code. There are a many free themes on WordPress, which I will explain how to access and choose.
Once you have gotten more advanced, there are plenty of places to buy different themes on the internet. The free themes work just fine, however they aren’t the sexiest. You can buy cleaner and sexier themes through Themes Kingdom here. (different installation process as noted below)
For free themes follow these instructions:
From your dashboard when you first log into WordPress, there is a menu of options to your left. When manipulating almost anything in WordPress, you will be referred to the menu on the left of the screen.
To pick a theme, hover your mouse over “Appearance” then click on “Themes.” This will take you to the Themes page. On the top in the middle, click on “WordPress.org Themes.” This will take you to your options for free themes that are installed onto WordPress directly. From here, you can search the themes available.
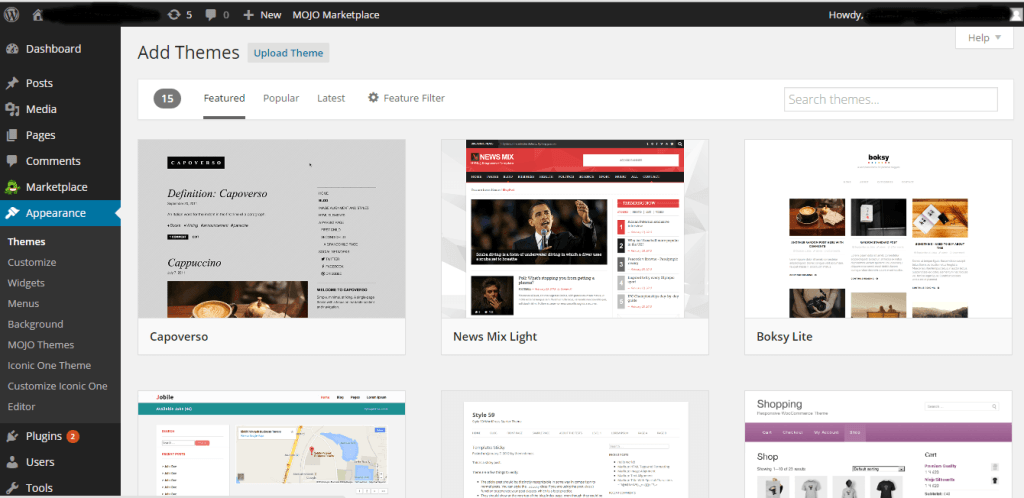 Figure 5
As you can see from Figure 5, on the top, you can see there are different ways to search themes. You can browse by “Featured,” Popular,” and “Latest.” Just click on that particular label, and it will give you a variety of themes to browse through. However, if you want a more precise way to search themes, you can click on the “Feature Filter” and search by many different filters.
You can also search for themes using the search button, for example, if you know the name of a theme you want or a certain attribute a theme has. For example, if you want a theme that works well with mobile phones, you can search “responsive” and it will list all the themes available that are designed with mobile computing in mind.
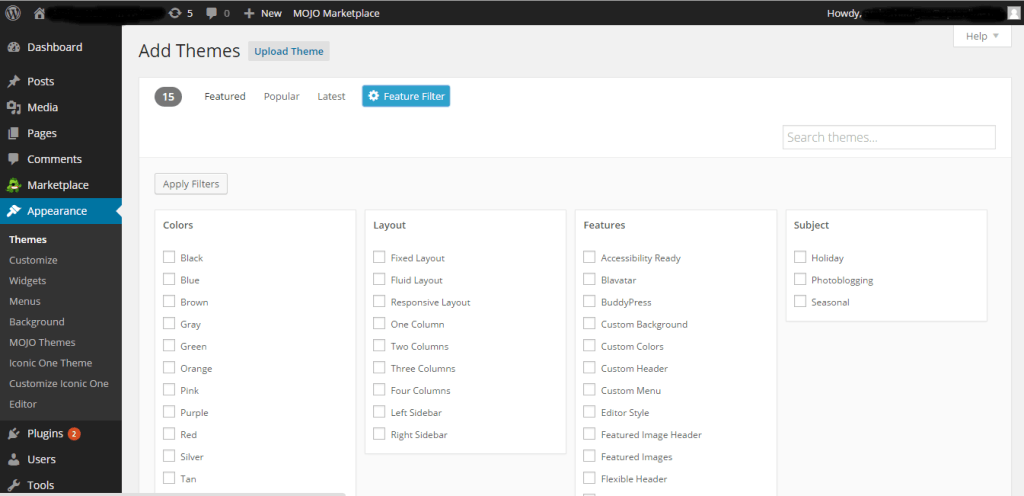 Figure 6
When you click on “Feature Filter,” you will be taken to screen shown in Figure 6. The Feature Filter option lets you search themes by color, layout, and different features. If you have a certain color in mind, for example, you can click that color and search for themes that are created with this color.
Another way that websites differ is through their setup. For example, if you want a single column on your site with just a sidebar on the right for your page options, you can search for this. If you want two columns on your website, you can search for this also. If you are unsure of what you want, browse through many different options.
Honestly, the way I found the theme that I liked best was to try a few that looked good to me and see how they changed my pages. The nice thing about themes is that you can go and change them anytime you want by searching for a new theme and following the instructions to install it.
Once you have picked a theme, you need to install it.
As you browse the theme, you can hover your mouse over any specific theme, and it gives you two options, either “Install” or “Preview.” I always like to preview the theme first. It will give you a full-screen version of the theme and show you exactly what it looks like. When you preview the theme, there will be a bar on the left that explains the theme and gives you the opportunity to install it. If you want to install this theme, hit the “Install” button. If not, go back to the theme list and check out some others.
Remember, you can do this again and again. You are not stuck with one theme, and you can change it anytime you want. Just return to the “Themes” page, browse again, and go through the steps. WordPress will keep all the themes you have installed on your site unless it has been deleted, but it will only have one active theme at a time. Figure 7 gives you an example of a previewed theme.
Note- Often times the theme ‘preview’ option will not look how the actual website will look once the theme is installed and activated on your website. The only way to really see, is to install and activate each theme that you like, individually.
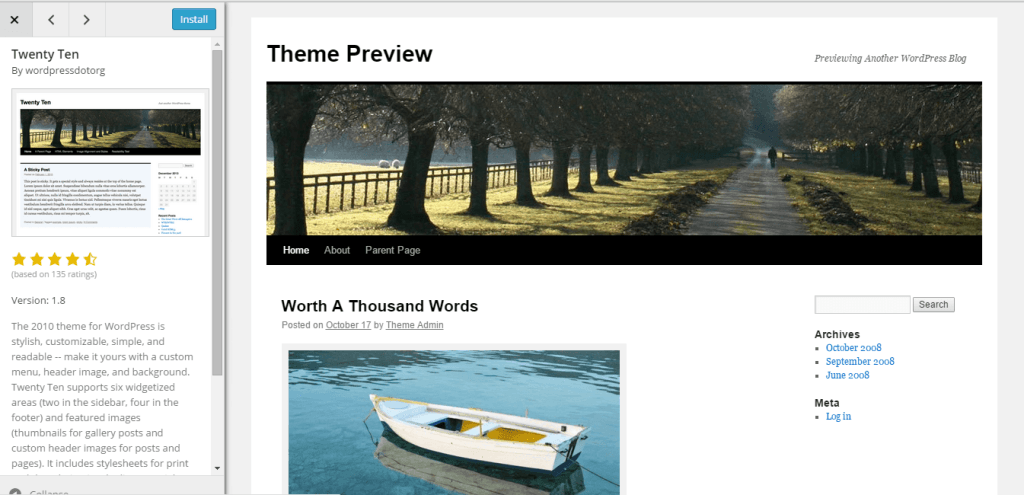 Figure 7
For paid themes follow these instructions:
WordPress shows only the themes that are free and that they have approved. However, there are a great many other themes available on the internet. You can even purchase themes that are more functional, look modern, have more features, and work better than the ones provided for free. To buy better looking themes, click here. Once you pay for the theme, then you will be directed to ‘download’ it. You should be downloading a ‘.zip’ file.
Once you have the .zip file on your computer, you can ‘upload’ it to your WordPress dashboard. If you would like to use one, Figure 6 shows the screen where you would upload the theme. Click “Upload Theme” next to the Add Theme title, and it will take you to the screen where you can upload it. From there, the instructions to activate the theme are exactly the same.
Once you install the theme, you can return back to the dashboard. At this point, we can start to add content to your website!
PS. Want to see how the theme looks after you activate it? Go visit your website domain in a new browser window and you can view the updated theme. One thing to note, is that most themes don’t look like they do in their previews. Themes can be notoriously tricky to set up. Most purchased themes come with ‘documentation’ on how to set them up. Other themes you will have to play around with through the WordPress dashboard to get to look how you want. For more help setting up your theme, you can inquire about hiring me here.
Chapter 4: Adding Pages
Now it’s time to create the pages that drive your website. This is where the content is added. It’s important to know how many and what types of pages you desire for your site. For example, if you are a musician and are creating a site that will showcase your music, you want several different pages, such as ‘Home’ page, ‘Testimonials’, ‘Videos’, and ‘About the Musician’.
This would be a good place to start, although you can add as many pages as you like. You can always go back and add pages later, but at least to get started, brainstorm for some ideas of a few pages to create.
Creating a Page
The first page to think about is your home page. This will be the first page people see when they come to your website. You will want your most important information there. What you choose to put there is completely up to you. Pictures, text, or other media can be imbedded in your website. This chapter will describe how to create this first page. You can then repeat the steps to create other pages.
From your dashboard, along the left side you will see the option to choose “Pages.” If you hover your mouse over “Pages,” you will see two options, either “All Pages” or “Add New.” Choose “Add New.” Once you do this, what you will see is shown in Figure 8.
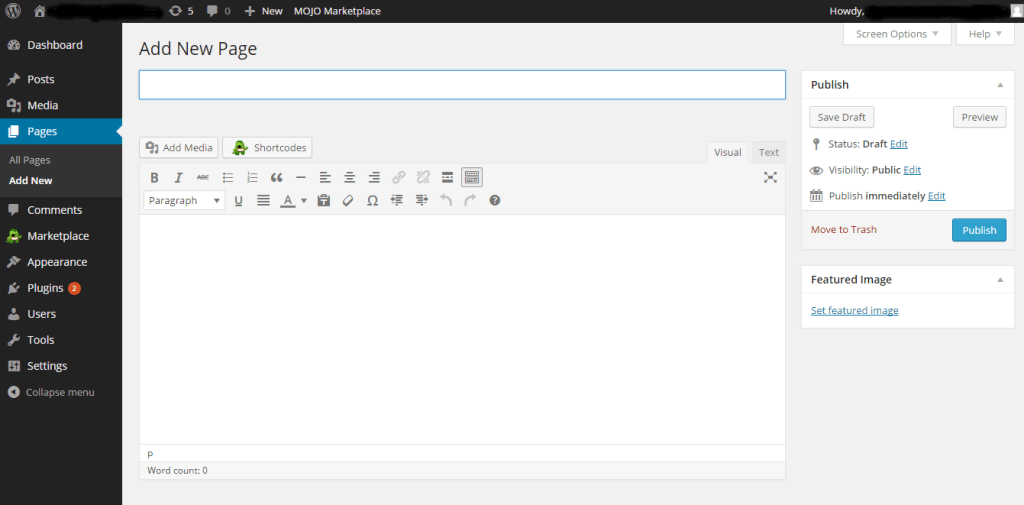 Figure 8
Add a title to the page in the box at the top of the screen under “Add New Page.” You can name it whatever you want, although most people title their front page “Home.” Once you have done this, you can add your text and manipulate it however you want. The controls on the text are much like those in any word processing program. You can change the font color, the text size, and bold, underline, or italicize your writing. It also gives you the option to justify your text to the left, the center, or to the right. If you have ever used any word processing program, these controls should look very familiar.
One important thing to note about naming your pages. When creating a home page, most people name it home. This has a lot to do with the fact that whatever you name your page here will be how it shows up on the navigation on your website. When you go to a site, it gives you tabs to click for different pages on that site, such as “Home,” “About Me,” “Products,” and others, this is where they get that name.
If you name your pages Home, Blog, and Products, for example, this is how they will show up in the navigation menu. So make sure you think carefully about what you are naming your pages when you create them.
On the right side of the screen, you can see the options for “Save Draft,” “Preview,” and “Publish.” WordPress will save your work automatically after a specified number of minutes, but it never hurts to save your draft at regular intervals. The “Preview” button will show what your page will look like with your theme and the content you have added. “Publish” will publish your page to the internet. Don’t worry, however! You can always go back and make changes the same way you created it.
Adding Media to Your Page
You can also add different types of media to your website. For example, you can add a picture to your site, or a video or audio clip. To do so, click “Add Media” at the top. You will have the option of choosing media already loaded to the page (although at this point, you won’t have any) or upload files. The first time you load anything onto your page, you will need to upload it from your computer.
Once you have uploaded it, it stays on your server and you can see them under “Media Library.” Once you choose “Upload Files”, you can either drag and drop your file from your computer to the screen or hit “Select Files” and find them on your computer. Then you click the “Insert into Page” button at the bottom to insert it.
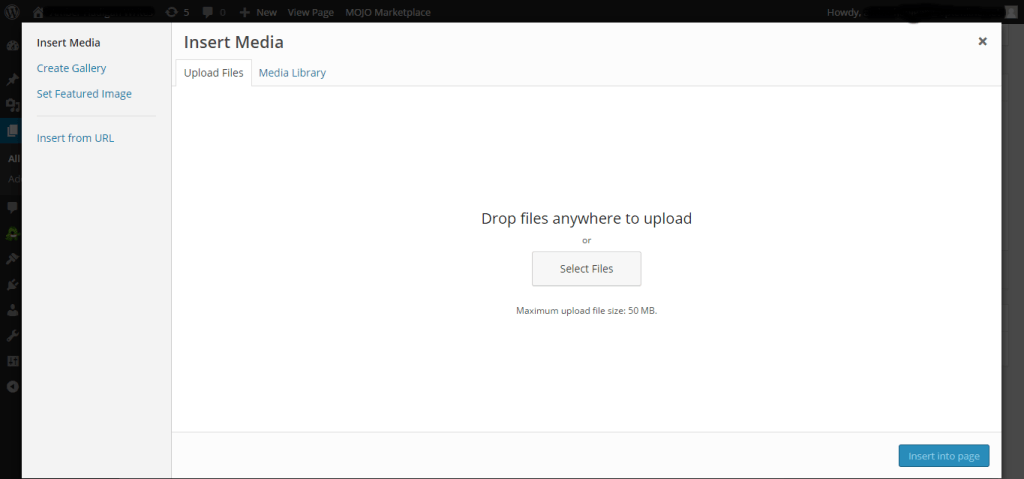 Figure 9
When adding media, you should have your cursor in the place within your block of text where you want it. For example, if you have a paragraph describing the purpose of your website and then you want to insert a picture after this paragraph, make sure the cursor is under the first paragraph where you want the picture. It will be inserted wherever your cursor is on the screen.
You also have the option of justifying the media file to the left, center, or right, just like you do with text. If you make a mistake, you can delete the media, replace your cursor, and re-add it. At this point, it will exist in your media library and you do not have to bring it over again from your computer. In Figure 9 above, you can see on the top the choice of “Upload Files” and “Media Library.” Choose upload files the first time you are loading a file from your computer. After that, the file will be saved to your account and you can choose “Media Library.”
Link a Website or Email Address to Your Page
Another option that you might want to do is link to another site from yours. For example, on your about me page, or homepage, you might link to this page, because it helped you start a WordPress website. If you want to insert a hyperlink in your text, there is a button on the top that is shaped like a link in a chain. When you put your mouse over it, it will say “Insert/Edit Link.”
Once you highlight a portion of text you want to create a hyperlink for, click that button. (Figure 10) After you do this, you will end up with a screen that allows you to add the website you want to insert into the text. (Figure 11) Then you just need to put in the site and a title (optional), and WordPress will create the link automatically.
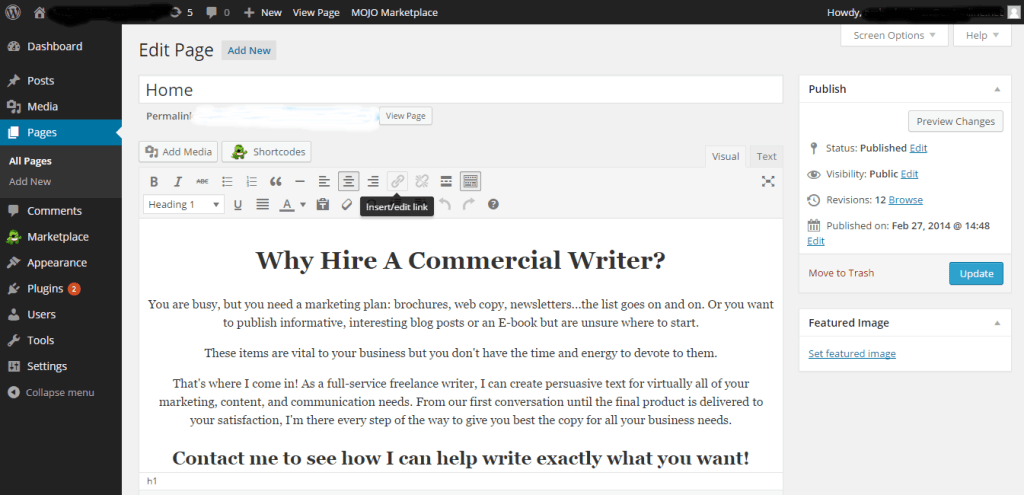 Figure 10
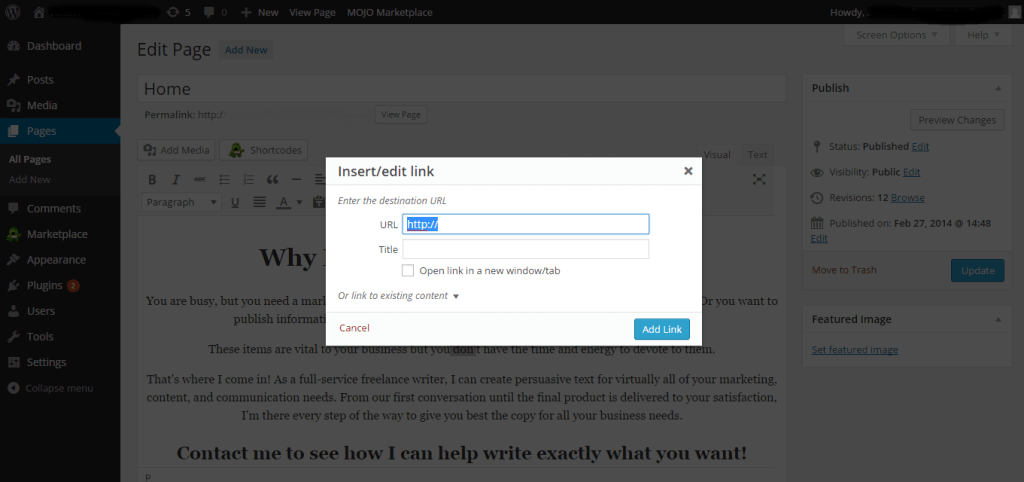 Figure 11
For example, you might have a sentence in your blog, or about me page that says: “This is my first WordPress website! Shout out to this article for helping me set up my WordPress site.” (where the text “this article” links to this article’s url: https://www.websitetigers.com/start-a-wordpress-website/ )
You can do the same thing with email. If you want to create a link where someone can email you when they click on your email or on text, you follow the same steps. The only difference is that, in the destination website, you type “mailto:email address” in the hyperlink box instead of a website address. For example, mailto:toby@websitetigers.com in the destination box.
Preview and Publish
Once you have completed your page and would like to see how it looks, you can preview it by hitting the “Preview” button in the upper right of the screen. This will open a new tab that allows you to see exactly what your website will look like with the theme you have chosen and the content you created. If you like what you see, all you have to do is click on “Publish” and your new page will be available on the internet.
Blog or Static Website
At this point, you will notice a couple things. First, because WordPress began as a way to create blogs, there is an option at the bottom of the page for people to comment, much like one would get in a blog post. My biggest frustration when setting up my first WordPress website was figuring out how to get rid of this comment section on all pages except for my ‘blog’ page. There are a few steps you need to take to do so.
Before you can do this, however, you need to choose one of two options for your home page. You can either have your home page be a static website page, or you can have it show your latest blog posts. Most people like to have it as a static web page. You can always create another page to have a blog, if you so desire. Because WordPress was created to be a platform for bloggers, it defaults to using your home page as a blogging page. You will need to change this if you want it to be a static website with only the content you just created.
To make your website ‘home’ page a static web page, you need to go to the “Settings” menu on the left of the screen. Once there, choose “Reading.” Once you do this, what you will see will resemble Figure 12.
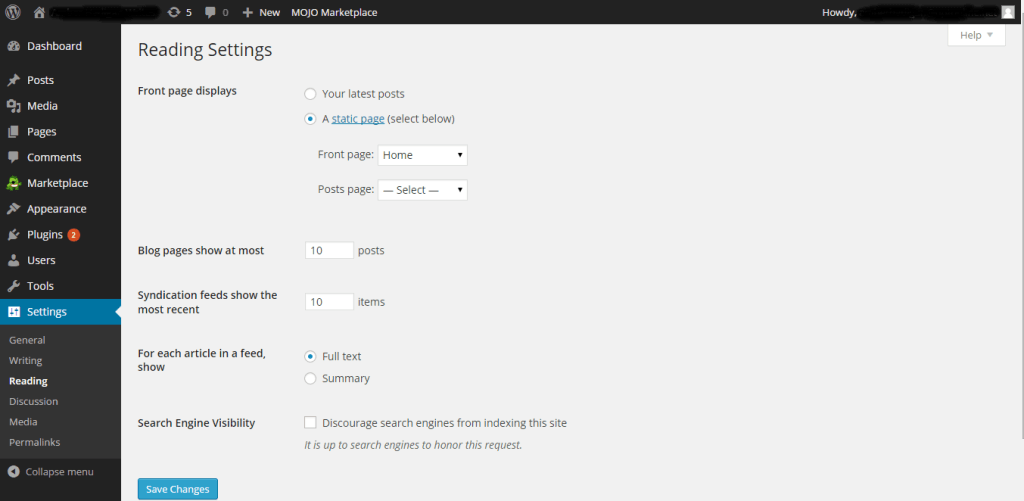 Figure 12
The first option is to choose your front page display. You can select either “Your Latest Posts” or “A Static Page.” If you want it to show blog posts, pick the first option. If you want it to be a static web page, choose the second. You will then have the option to choose which page is the front page of your website. Most people select their ‘Home’ page, but if you named it something else, make sure to select that page. You will also notice an option to pick a page where blog posts will appear.
If you do not plan on making a blog, you can ignore this completely. If you later want to create a page for blog posts, this is where you would designate the page dedicated to your blog posts. We will discuss using your website to host a blog in great detail in a later chapter.
The other thing you may want to do is to remove the ability for people to comment from your static home page. WordPress defaults to having posts allowed on all pages, even if it is not dedicated to blogging. You have the ability to change this, however. To do so, go to the “Pages” Menu on the left of the page and click on “All Pages.”
If you hover your mouse over your home page, you will see the option for “Quick Edit” (Figure 13). Click this.
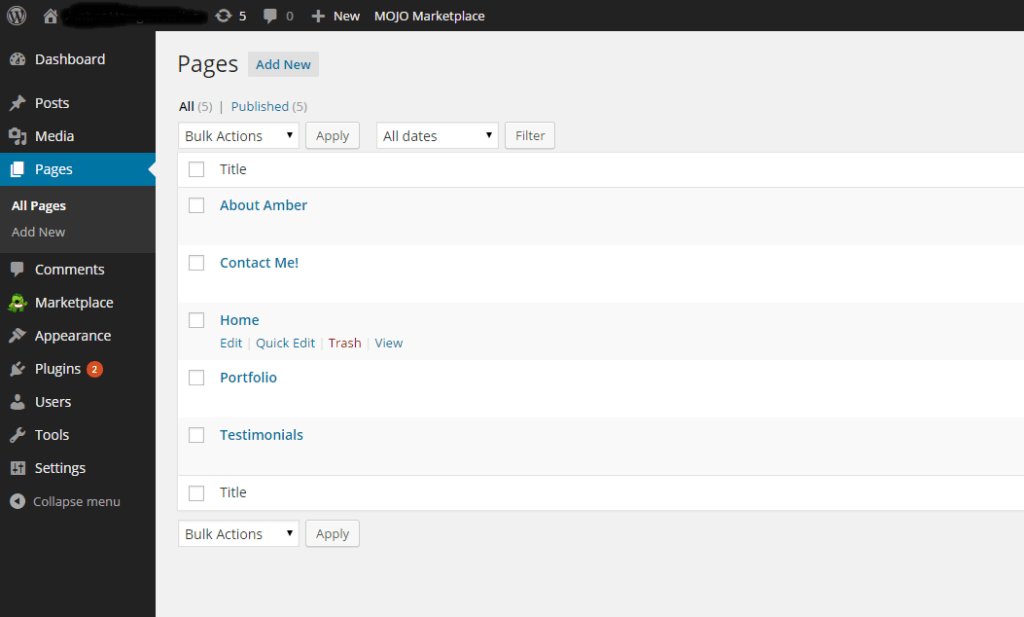 Figure 13
In Figure 14, you will see the option to “Allow Comments.” If you do not want comments on this page, make sure this is not checked. Once you have done this, click the “Apply” button in the bottom of the page and your changes will be saved.
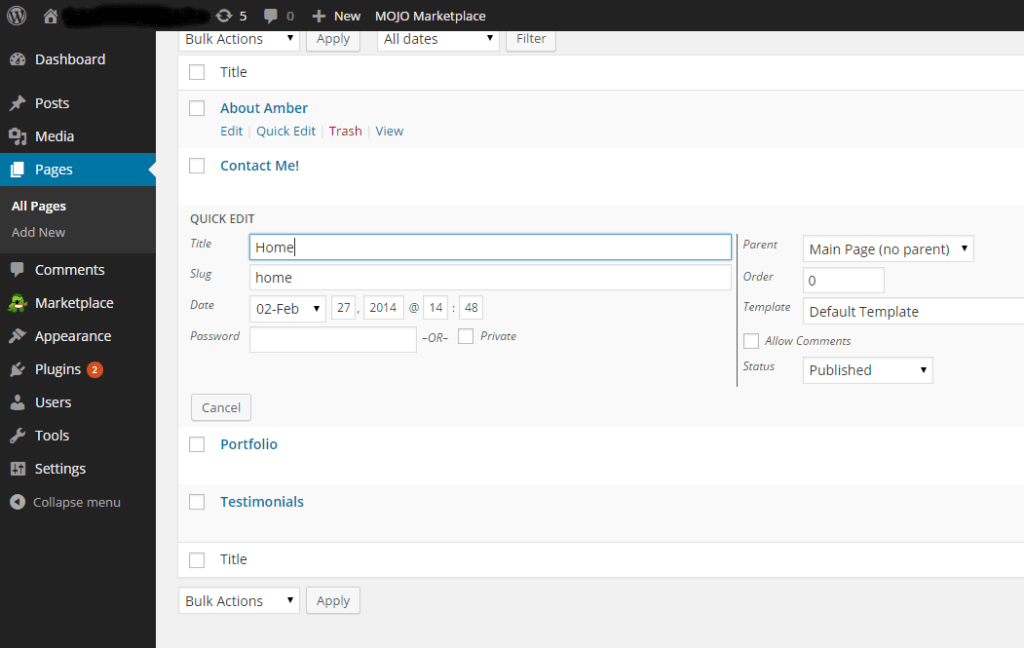 Figure 14
Once you have completed your front page, you can go through the same steps and create as many pages as you want. The only thing holding you back is storage space restrictions and your imagination!
Chapter 5: Blogging on Your WordPress Site
Even with your own website, you can still use WordPress as your blog. This is the original purpose of the software, and it works just as well with your own site as it does on the WordPress website. It all depends on how you want to set it up.
The first thing you need to decide is which page you want to make your posting page. Remember back in Chapter 4 where we discussed the posting page? We will revisit this now.
Creating a Blogging Page
Figure 12 is shown below again. To get to this page, go to “Settings” under the left menu and click “Reading.” Under the section labeled “Front Page Display,” you chose whether to have the home page a static web page or a posting page. If you chose posting, then you have already figured this out. Your front page will be the page that your blog posts will be published to.
However, if you chose to have your home page be a static website, you need to pick another page to publish your blog posts to. You can do this under “Post Page.” This is where you select which page to have your posts published to. Use the arrow to bring up the scroll. It will show you a list of all the pages you have created, and then you can pick one to have your posts published to.
If you want a separate page to do this and haven’t created it yet, go back to creating a new page, then come back to this spot to make that particular page the one for your blog. I usually title my page for blog posting “Blog” which makes it easier for people navigating your page to find your blog.
Figure 12
The next thing you need to decide is how many posts to show on your page. You can do this on the same page as the one where you choose which page to make your blog post page. The next section in Figure 12 shows “Blog Pages Show At Most,” and you can put in the number of posts you wish to show on that page. This means that the older posts will scroll off the page after you have posted that many blog posts. You can choose to put in however many you want on the page. The other number to choose is “Syndication Feed Shows The Most Recent.” Most people set this as the same number as their “Shows” number.
The last decision you will have to make about your WordPress blog is whether you want to allow comments to be shown on your blog posts. Many people write blogs so that they can interact with their readers, so they really want comments to be allowed on this page. Readers cannot interact with you if you do not provide a vehicle for them to do so. However, you have the choice of whether you want to allow people to comment on your posts or not. You will also be able to moderate your comments, so they will not be posted to your website unless you allow them. \We will discuss moderating your blog shortly.
Just like we did with your static front page, you can choose to allow comments on this page. Again, go to “Pages” on the left of the screen and choose “All Pages.” Hover your cursor over the page you have chosen to house your blog posts and hit “Quick Edit.” On the right side, check the box “Allow Comments.” This will put in the section of the site that allows others to comment on your website.
Comments on Your Blog
Figure 15 shows the section to deal with comments. To get to this screen, go to the “Settings” menu on the left of the page and click on “Discussion.” Here, you have many different options for how to handle commenting on your blog page. Several things will need to be explained.
- Attempt to notify any blogs linked to from the article: If you link another blog to your blog, WordPress will automatically try to notify that blog that you have linked to them when you have this button checked. One of the beautiful things about blogging is that people can share information easily, and blogs love it when others link back to them. It is a great way to get new readers to other blogs.
- Allow link notifications from other blogs: This will allow other blogs to notify you if they link back to your blog. This is the flip side of the last one. Others want to know if you reference them, and you probably want to know if they reference you.
- Allow people to post comments on new articles: If you want people to be able to post comments, check this box.
- Comment author must fill out name and email: This is great for accountability and stopping spam comments on your blog. If a person needs to fill out this information, it is less likely that an automatic spam mechanism will try to comment on your blog with junk.
- Users must be registered and logged in to comment: If your website has a login option, this makes it easier to regulate commenting traffic to your blog. However, most people don’t bother with this at an early stage.
- Automatically close comments on articles older than _____ days: You can choose to have comments automatically closed after a certain number of days, if you like. Leave it unchecked if you want comments to be allowed indefinitely.
- Enable threaded (nested) comments ___ levels deep: Nesting comments allows people to reply directly to other comments. It will then nest those comments together so that they can be read as a thread. WordPress.org recommends 3 level deep nesting.
- Break comments into pages with ___ top level comments per page and the ___ page displayed by default: If your blog gets a lot of traffic (congrats if you find yourself in that situation), then you may want to break your comments up into pages. You can control the number of comments on each page. You can also control if they see the oldest or newest comments first.
- Email me whenever: Under this heading there are two choices. This is where you can choose to hold all comments for moderation, meaning that you must go into your site and approve a comment before it shows up on your page. This is a great way to regulate spam, but can become very time consuming if your blog is very popular. You can also choose to have WordPress send you an email whenever a new comment appears, even if you choose not to moderate them.
- There are a few ways to find a middle ground between no moderation of comments and having to moderate everything that comes in. You can choose to moderate everything under “Comment must be manually approved.” You can also allow comments to be published without moderation if the commenter has had other comments previously approved by you. Lastly, you can choose to hold comments for moderation if they contain hyperlinks, since a great deal of spam has hyperlinks embedded in them. You have the option to choose to hold comments containing a certain number of hyperlinks. Many people set this at two, as oftentimes commenters will include a single hyperlink if it is relevant to the discussion. These options are pretty self-explanatory, and I recommend just picking what sounds right to you. You can always switch things up later if they aren’t working.
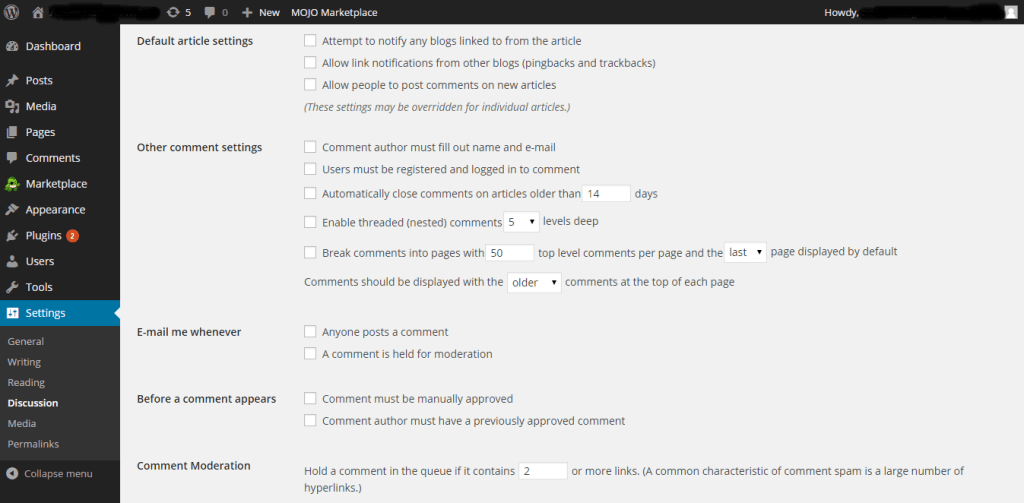 Figure 15
As you can see, there are many options for how to control your blog posts and what kinds of comments you get on them. I’ll discuss how to moderate your comments after we discuss the next topic. Once you have decided how your blog will be displayed and how comments will be handled, it is time to publish your first blog post!
How to Add a Blog Post
To add a blog post, go back to the menu on the left of the screen. If you hover your mouse over “Posts”, you will have the option to “Add New.” Click on this. It will take you to the screen shown in Figure 16. This screen looks very similar to the “Add a Page” screen. It gives you the ability to add a title and put in your text and media, the same as you did when you added a page. On the right, you have the option to save your draft, preview it, and to publish the post, the same as when you added a Page to your website.
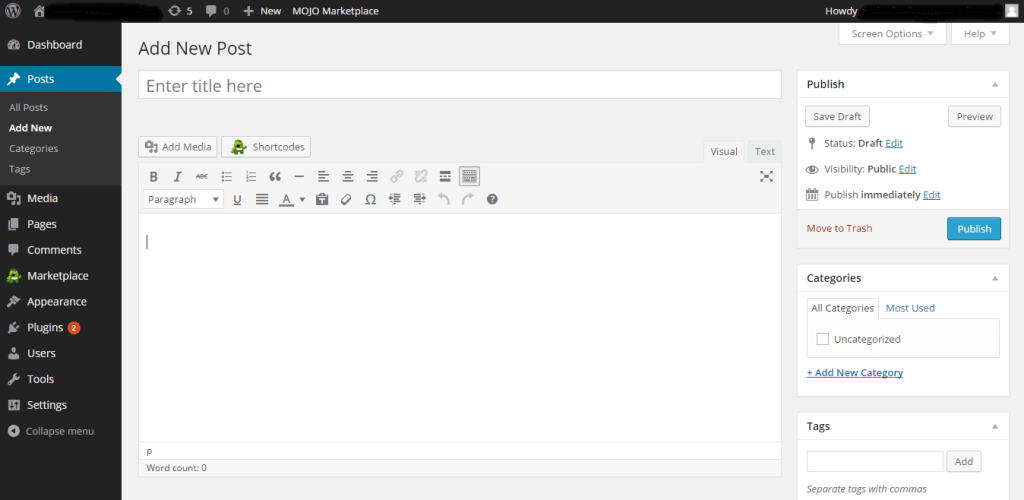 Figure 16
Categories and Tags
There are two other things to notice on the right-hand side of the screen. These are Categories and Tags. These two options give you the ability to group different posts together. A category should be used to describe posts in broad terms. However, if you have a great deal of different topics, you will end up with a very long list of categories. This is why tags were created. With tags, you can create more specific details about what is involved in your posts. The use of categories and tags are optional, but if you want to sort your posts and be able to search by these sorts, they come in handy, especially if you post a lot.
Categories should most likely be included on your blog. You can add your blog categories by clicking the “Add New Category” button. Once you do that, you can write a description of the category, which will then be saved for future use. For example, if you are starting a cooking blog, and you are adding a recipe for baking cookies, your category may be “Baking” and “Desserts.” You will need to add these categories before using them, but once you add them, they will be available for all your blog posts. Then, if you want to make things more specific, you can add a tag. To do this, just type the tag description under “Tags” and click “Add.”
A tag for our example may be “cookies” and “chocolate chip.” You can add as many tags as you want. You can also search your tags based on most used in the past. Just make sure to separate each Tag with a comma. You will need to create the tags each time you write a blog post. Again, both tags and comments are optional, however they generally increase the ease of use and navigation for your users.
One extra tip- instead of linking directly to individual blog posts in a menu bar, you can link to a ‘category’ page which shows many different posts.
You also have the ability to set a “Featured Image” for your post. WordPress says that a featured image is meant to represent the mood, content, or theme of your particular blog post. To set a featured image for a particular blog post, click the “Set Featured Image” button and add media just as we have discussed before. It will add your image to the top of your blog post.
How the featured image is shown will depend on the theme that you chose. To get an idea of what it will look like, click the “Preview” button and take a look. You don’t really have control over this except to choose another theme, which will change the look of your entire website.
Note- Website developers can help customize the look of your blog. For example, by having your featured images show up on your home page in a slider. Contact me here for more info.
As with posting a new page, you must hit the “Publish” button for the blog post to be published to the internet. You can also “Save Draft” and come back to it later.
Congratulations! You have created your first blog post. To create more, all you need to do is follow the same steps above for each new post. Your page will automatically be updated with the new post as soon as you hit the “Publish” button. Your most recent post will be shown at the top of the page, and then can be scrolled in reverse sequential order down the page.
Moderating Comments
You have now successfully created a blog (if you missed this content, check out the table of contents in the beginning of this guide). And now you have successfully published your first blog post. Now someone comes and comments on it. At this point, there is only one thing left to do: moderate the comments you receive. If you are lucky enough to have readers (which is probably why you started your blog!), you will need to moderate the comments your readers leave, depending on what setting you chose to use earlier. To do this, go to the “Comments” menu on the left of the screen. It will bring you to the page shown in Figure 17. The figure shown here has several comments to moderate.
Unfortunately, most of them are spam. You can read the comment and choose whether to approve it, mark it as spam, or to put the comment in the trash. The entire comment is shown on the screen here. If you hover your mouse over a specific comment, it will give you the options to approve, edit the comment, reply to the comment, mark it as spam, or trash it.
You can choose to moderate each comment separately or make what WordPress calls “Bulk Actions.” To do this, just check each post that you want for a particular action, and click on the “Bulk Action” menu and choose which action you want for all the comments you have clicked.
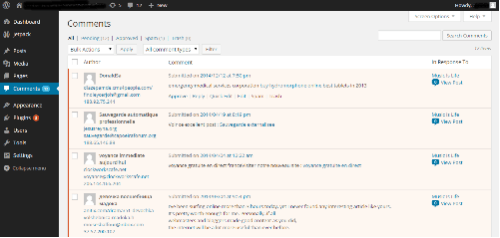
Figure 17
You now have a complete web site with blog posting abilities. You have covered the basic needs of any website. The next chapter will cover some more advanced things you can do to customize your site to your preferences using more WordPress settings.
Chapter 6: Customizing WordPress Settings
You have a completed website, but there are still some things you can do to customize your site to your liking. Under the “Settings” menu on the left side, there are several options for you to explore. We will discuss each in turn.
General Settings
Figure 18 is a screen shot of the first option under Settings, the “General” tab. This is the tab where you can name your site with a title and create a tag line that explains what your site is about. Your title and tag line will show at the top of every page on your site, depending on the theme you chose.
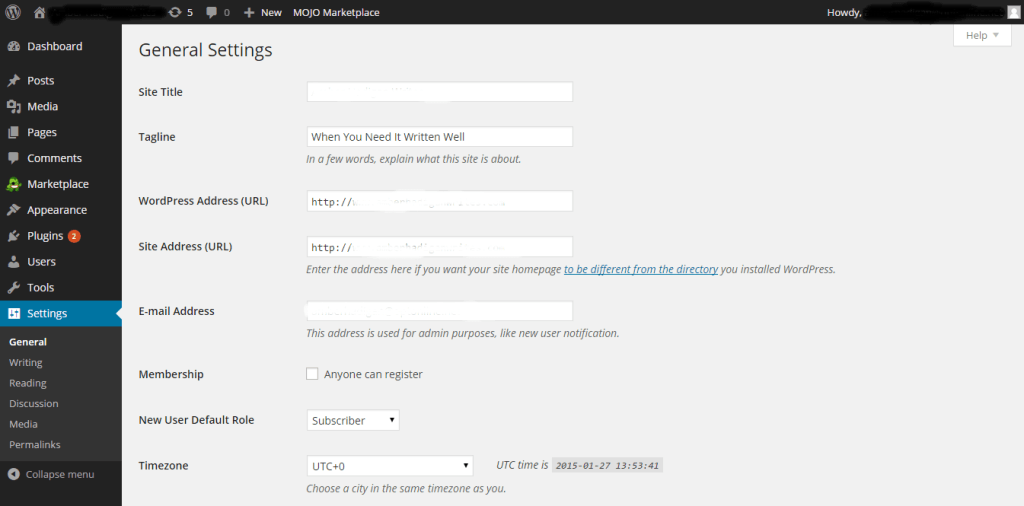 Figure 18
Scrolling down on the same screen, you have the ability to display dates, times, and set the language of your site. The date and time are especially important for tagging blog posts. When you create a post, WordPress will automatically tag a post with the date and time. Comments will also be tagged. It will use the format you choose under the general WordPress settings.
Writing Settings for Blog Posts
Figure 19 displays the “Writing” settings page. This page controls the defaults of your blog post settings. You are able to change the default settings of your post categories and even the format of your posts. There are so many options for post formats. Here is a description of different options for your posts. Depending on what you are posting, you may want to change your default category.
- Standard: The standard post is text-based. You can insert media, as described above, but will format most of the post based on text. If you are writing typical blog posts, Standard is the best option for you.
- Aside: This format is good for brief text and quick thoughts.
- Chat: This allows you to highlight chats that you’ve had with others.
- Gallery: This is great for displaying many different pictures in a gallery format. You can edit how the gallery is displayed by going to “Settings” and “Media’”
- Link: This is the perfect format to share a web link and a few thoughts you have on it.
- Image: Choose this function to highlight a single image.
- Quote: If you want a specific block of text highlighted, adding a quote format will do the trick.
- Status: Much like a Facebook status, this allows you to add a quick update about what you are doing right now.
- Video: Use this if you are highlighting a video in your post.
- Audio: Use this if you are highlighting an audio link, such as a song or podcast.
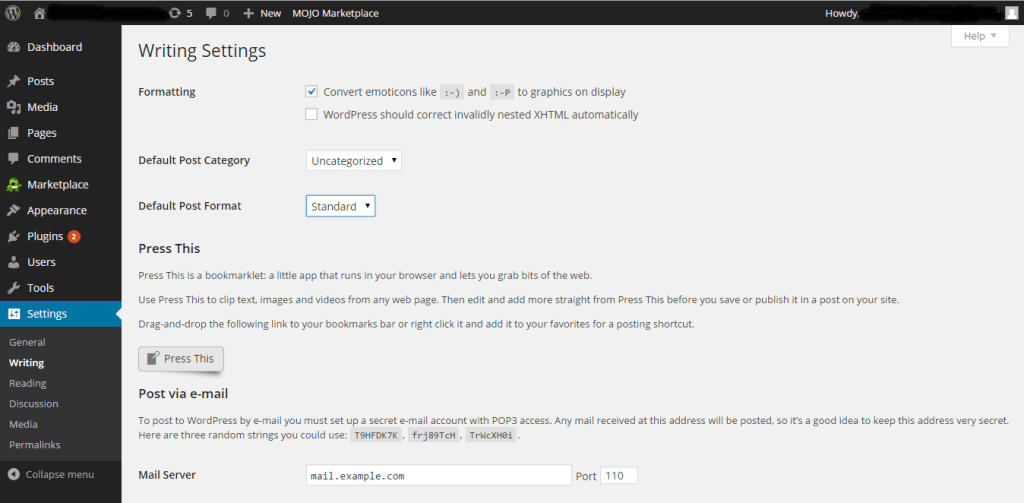 Figure 19
The option here is to set a default for all your blog posts. The thing to keep in mind, however, is that not all themes support all blog post formats. If you want to use different formats, make sure the theme you choose supports your desired format. If you are a musician, for example, you want to choose a theme that supports audio and video formats.
You can check to see which basic themes support different formats at: http://en.support.WordPress.com/themes/post-formats/.
You will want to familiarize yourself with the different abilities of themes for blog posting if you want to create specialized posts. Most people, however, will want the standard blog setting. Remember, you can still embed media in a standard post.
Media Settings
Under the Settings tab “Media,” you can choose the size of the images you upload to your WordPress account. Under this tab you can also have WordPress organize your uploads into month and year-based files for easier searching. WordPress defaults to the settings shown in Figure 20.
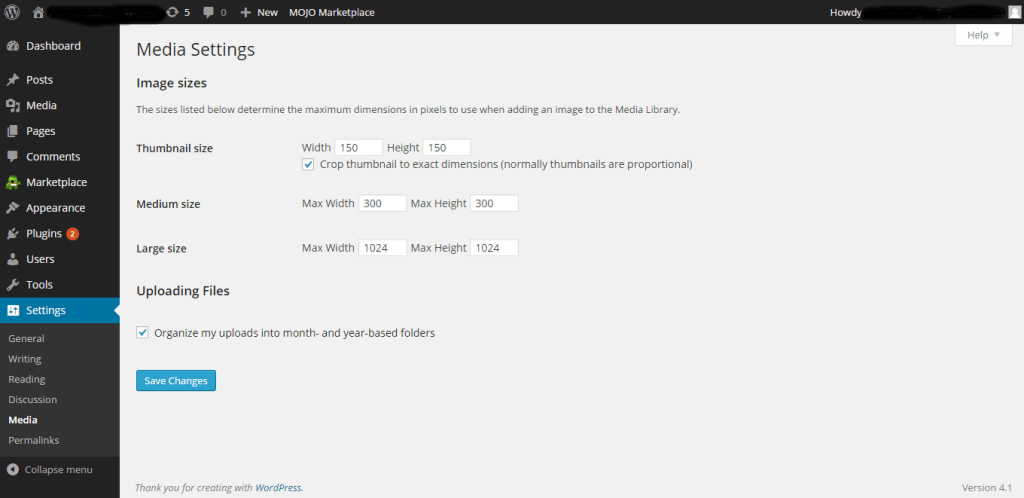 Figure 20
Permalink Settings
The “permalinks” setting allows you to format your URLs. There are several different options, including by date and name, by month and name, by post name, and the default setting, which shows a post number. You also have the ability to create a custom structure for your post URL by category or tag. See Figure 21. Typically, I recommend changing to the “day and name” structure, or to simply the “post name” setting.
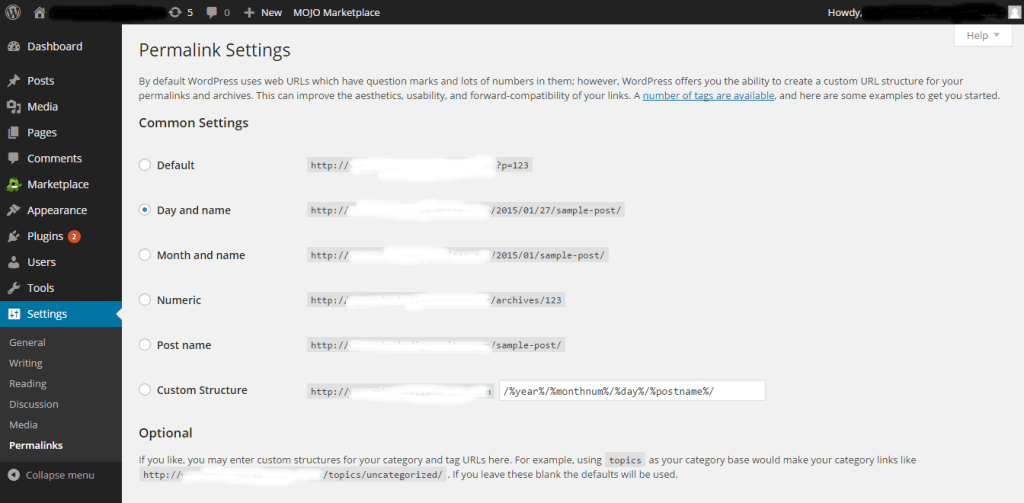 Figure 21
Widgets
The last thing you need to know about that will help you customize your page on WordPress is Widgets. A widget is a small block that adds specific content or features on the sidebar of your WordPress site. An example of a widget would be a search box imbedded into your site. They can be added, removed, or rearranged. Where widgets appear on your site will depend on the theme you have chosen.
Note- Many wordpress themes have unique integrations with widgets. Often times there will be a ‘footer widget’, a ‘home page’ widget, and one or two ‘sidebar’ widgets. The concept of a widget is always the same. It allows you to add text and images to a unique location on your WordPress website. Sometimes, adding content to one widget on the ‘widgets’ page will add it to multiple pages (for example, with the sidebar widget).
To see your widgets, go to the “Appearance” menu on the left side, and click “Widgets.”
You will see an example of this menu in Figure 22. On the left side of the screen you will see the widgets that are available for you to use. On the right side of the screen, you will see places where you can add widgets. In the figure below, you can add widgets to several places, including the top and bottom of your sidebars and to the footer. To add a widget, all you have to do is click and drag the widget you want to use from the left of your screen to the area you want it located. So, if you want to add a calendar onto your footer, just click and drag “Calendar” to the “Footer” section on the right, and it will be added. To remove your widget, just drag it back.
Depending on the theme and any plugins you may have added, your widget selection will be different. If you add several widgets installed into one place, you can change their order by dragging them into the order you desire.
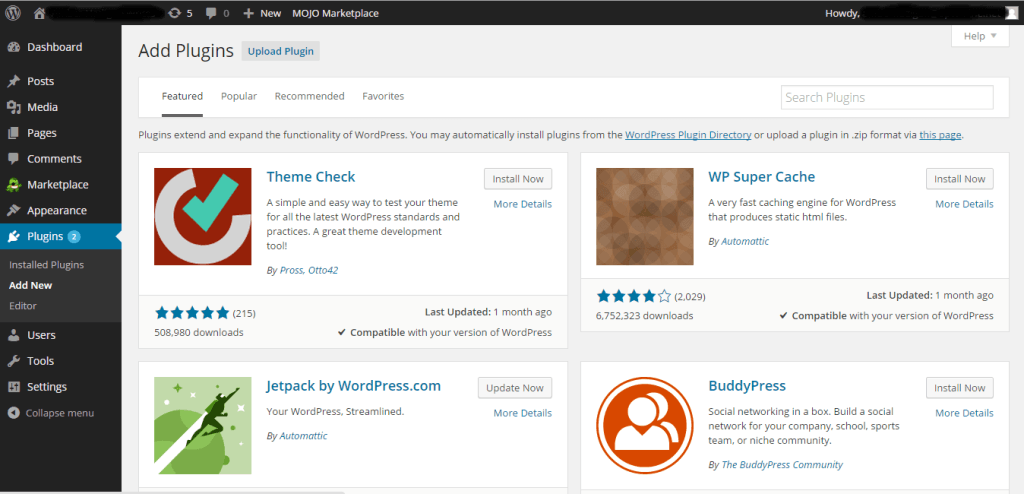 Figure 22
You have done just about everything necessary to create a customized WordPress website. The next chapter will describe one more thing that you should know if you are going to have a WordPress website- understanding and using Plugins to your advantage. Although Plugins are optional, it is important to know that many functional plugins exist and can be used to expand the integrations, security, marketing capabilities, and much more for your WordPress site.
Chapter 7: Plugins
The last thing you really need to know about WordPress is how to use a Plugin. A plugin is an application that is essentially an add-on to WordPress, which you can install to increase the capabilities of your website. Although the scope and usefulness of every plugin available is beyond the scope of this guide, it is important to know that plugins exist and how you should best incorporate them. With this knowledge, you can explore them on your own and use what you need. As there are over 30,000 different plugins available for WordPress, it would be impossible to describe them all in one place.
Note- Use all plugins at your own risk. Many plugins have security risks associated with them. You are responsible for researching all plugins safety on your own. Or you can get the help from a qualified web developer to help you decide how to best go about choosing which plugins would go best on your new WordPress site. One tip you might want to try is looking at the reviews and the number of downloads for each plugin you want to add to your site.
If you click on the “Plugins” menu on the left toolbar, you will see the options to view your installed plugins, add new, and a plugin editor. The editor function is way beyond the scope of this guide. However, you may need to access the other two options to help make your website more functional.
If you click on “Add New” button under the “plugins” menu, you will see something that looks like Figure 23. Just as when you searched for a theme, Plugins can be searched that same way. The page will take you to the Featured plugins available. These are listed by WordPress. You can browse through popular, recommended, and favorite plugins here.
You also have the ability to search plugins based on a name or function. Some popular plugins will do a great variety of tasks. For example, you can get a plugin to increase the security of your WordPress website (Wordfence Security), a plugin to assist with moderating comments on your blog and filtering out spam automatically (Akismet), and one that helps optimize your website and blog for searches in Google (Yoast SEO).
Many businesses like to add a plugin to help them capture email addresses to people who choose to give them. This allows them to create email lists to sell their product or service. These are just a few of the multitude of plugins available for your WordPress website.
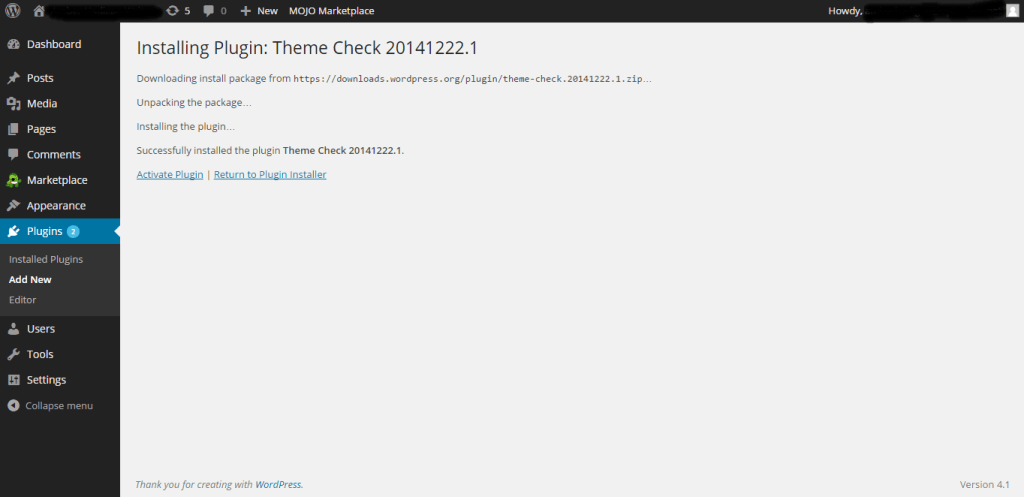 Figure 23
Frankly, the list of plugin functions can go on and on. However, you need to make sure to install only the plugins you need. Too many plugins can slow down your site, which can frustrate people who may visit your blog or business website. You could spend years exploring all the plugins to use. For a simple site, often times you won’t need many, or even any at all. It is important, however, for you to know this is available. As your website grows with your knowledge, you may choose to incorporate them.
To install a WordPress plugin, click the “Install Now” button on that particular plugin. It will automatically install the plugin. After that, you must click the “Activate” button after the installation has been completed. An installed but inactivated plugin view is shown in Figure 24.
Note- Check your site after you download a new plugin for functionality or design issues, because many times plugins will mess with your theme or other plugins. You can always deactivate any plugins that cause issues.
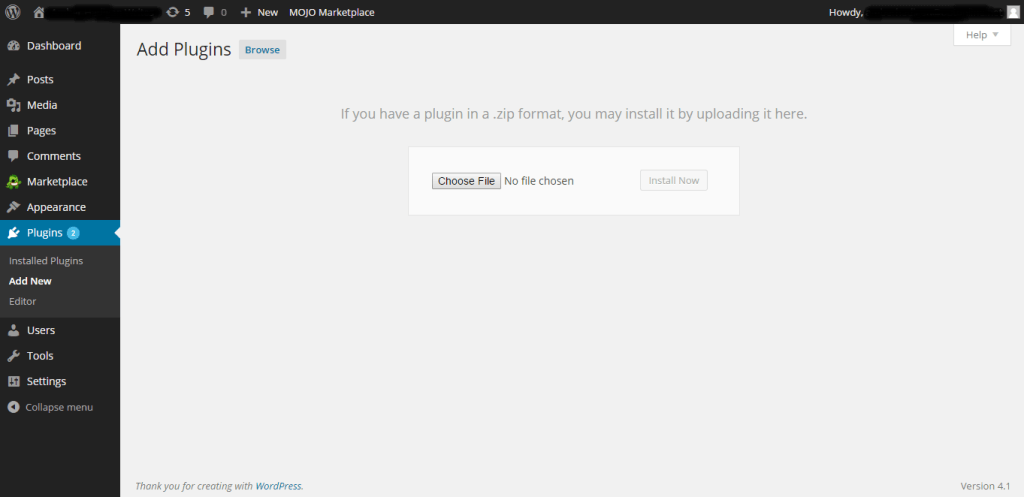 Figure 24
You also have the option to install plugins that aren’t a part of the WordPress directory. This could mean a plugin that you purchased or got from another source. To install a plugin that isn’t in the directory, go back to the “Add Plugin” screen (Figure 23) and click “Upload Plugin” in the upper left-hand side. WordPress will prompt you for a file location (Figure 25) and will upload the plugin and put it on your installed page, just like ones installed through the WordPress directory. Note- you will install the plugin as a .zip file format.
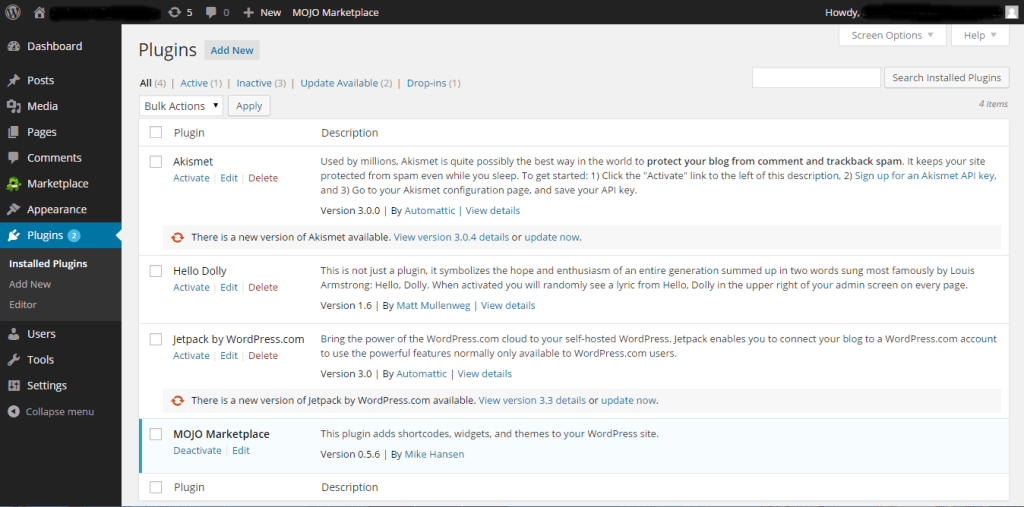 Figure 25
To view what plugins are installed on your site, which are active, and where you can delete unwanted plugins, go to the “Plugins” menu on the left and click “Installed Plugins.” This will take you to the view of Figure 26. From here, you can see which plugins are active, which are inactive, and whether a new version is available and you need to update. This is also the page that allows you to delete plugins on your page.
You will occasionally have to update your plugins, for example, when a new version of WordPress is created, plugins creators will update their software to ensure it is compatible with the new version of your site. I recommend updating whenever you notice it is required. Note- Updating plugins and themes can cause compatibility issues with your site. I recommend backing up your site first.
Take some time to explore the various plugins, especially the featured ones listed directly from WordPress. The limit is only within your imagination.
Conclusion
This article describes the basic steps necessary to create a website with WordPress. If you are a Nevada business owner, and have followed all of the instructions laid out above, then congratulations! You now have a basic Las Vegas business website with content that you have written. People can now visit your site and comment on your blog, or can see information about your business, or products. You must remember, this guide is NOT a comprehensive study on the WordPress universe.
Once you have a site up and working, you can take all the time you desire exploring the different functions of WordPress, including settings we did not cover in this guide, plug-ins that you may want to add to your site to make it more functional, and how to get different themes and plugins that are not free but may have more ability to be customized any way that you like.
People with a great deal of computer knowledge can even go into the WordPress code to manipulate their functions. But this is just the beginning.
Now that you have a basic knowledge and have your Las Vegas business website up and running, how far you go with it is up to you. Take what you have learned here and explore for yourself. WordPress is a very powerful tool, and the more you learn, the more you can accomplish.
Note- My company, Website Tigers in Las Vegas, has partnered with Bluehost and many other companies that we recommend in order to get you the best deals possible. In exchange we often receive affiliate commissions if you go through the links on this page. The City of Las Vegas is home to many businesses that don’t disclose their financial relationships. We are required to do so by affiliate law in the USA and also want you to know when we get compensated for something that we endorse.
There is so much more out there for you to discover! The WordPress platform is continually improving and so are the various developers, designers, and people like you that want to expand its reach. I hope you found success with my Las Vegas WordPress website design guide, and will share it with your friends. Thanks for reading!
References:
Main WordPress Site- https://wordpress.org
Las Vegas WordPress Website Hosting- http://www.bluehost.com
WP Engine Hosting- http://www.wpengine.com
WordPress Website Themes- http://www.themeskingdom.com
WordPress, more info on Wikipedia- http://en.wikipedia.org/wiki/WordPress
WordPress on Facebook – https://www.facebook.com/Wordpress